Building a Real-Time Chat Application with PHP and WebSockets
In this tutorial, you’ll learn how to build a real-time chat application using PHP for the backend, WebSockets for real-time communication, and HTML, CSS, and JavaScript for the frontend.
By the end of this guide, you’ll understand how to implement a basic real-time chat app from scratch.
Prerequisites
Before you start, ensure you have the following:
- Basic knowledge of PHP, HTML, CSS, and JavaScript.
- Composer installed to manage PHP dependencies.
- Familiarity with WebSockets and how to use them in PHP.
Technologies Used
- PHP: Backend logic and WebSocket server.
- WebSockets: Real-time, bidirectional communication.
- HTML: Structure of the chat interface.
- CSS: Styling for the frontend.
- JavaScript: WebSocket communication and UI interaction.
Steps to Build the Real-Time Chat Application
- Set Up the Project Folder
- Implement the WebSocket Server
- Create the Frontend UI
- Test the Application
Step 1: Set Up the Project Folder
Create a new project folder called php-chat-app. Inside this folder, install the Ratchet library for WebSockets using Composer.
composer require cboden/ratchetYour folder structure will look like this:
php-chat-app/
│
├── vendor/              # Composer dependencies (created when you run `composer install`)
├── socket.php           # WebSocket server (PHP)
├── index.html           # Frontend HTML layout
├── script.js            # JavaScript for WebSocket interaction
└── styles.css           # CSS for styling the chat UI
├── composer.json        # Composer configuration file (auto-generated)
└── composer.lock        # Lock file for Composer dependencies
Step 2: Implement the WebSocket Server
Next, create the WebSocket server using the Ratchet library. Create a file named socket.php and use the following code to set up the server:
<?php

use Ratchet\MessageComponentInterface;
use Ratchet\ConnectionInterface;

require __DIR__ . '/vendor/autoload.php';

class MyChat implements MessageComponentInterface {
    protected $clients;

    public function __construct() {
        $this->clients = new \SplObjectStorage;
    }

    public function onOpen(ConnectionInterface $conn) {
        $this->clients->attach($conn);
    }

    public function onMessage(ConnectionInterface $from, $msg) {
        foreach ($this->clients as $client) {
            if ($from !== $client) {
                $client->send($msg);
            }
        }
    }

    public function onClose(ConnectionInterface $conn) {
        $this->clients->detach($conn);
    }

    public function onError(ConnectionInterface $conn, \Exception $e) {
        $conn->close();
    }
}

$app = new Ratchet\App('localhost', 8080);
$app->route('/chat', new MyChat, array('*'));
$app->run();
This script creates a WebSocket server that listens for incoming connections, handles messages, and broadcasts them to all connected clients except the sender.
Step 3: Create the Frontend UI
Create the frontend chat interface in index.html:
<!DOCTYPE html>
<html lang="en">
  <head>
    <meta charset="UTF-8" />
    <meta name="viewport" content="width=device-width, initial-scale=1.0" />
    <title>PHP Realtime Chat Application</title>
    <link rel="stylesheet" href="./styles.css" />
  </head>
  <body>
    <div class="chat-container">
      <div class="chat-box" id="chat-box"></div>
      <input
        type="text"
        id="user-input"
        placeholder="Type a message..."
        onkeydown="submitOnEnter(this)"
      />
      <button onclick="sendMessage()">Send</button>
    </div>
    <script src="./script.js"></script>
  </body>
</html>
Now, style the chat interface using the following styles.css:
* {
  box-sizing: border-box;
  scroll-behavior: smooth;
}

body {
  font-family: Arial, sans-serif;
}

.chat-container {
  width: 350px;
  margin: 50px auto;
  border: 1px solid #ccc;
  border-radius: 5px;
  padding: 10px;
}

.chat-box {
  height: 350px;
  overflow-y: scroll;
  margin-bottom: 10px;
  padding: 10px;
  border: 1px solid #ccc;
  border-radius: 5px;
}

input[type="text"] {
  width: 200px;
  padding: 5px;
  margin-right: 5px;
}

button {
  padding: 5px 10px;
  cursor: pointer;
}

.incoming,
.outgoing {
  display: flex;
}

.outgoing {
  justify-content: flex-end;
}

.incoming {
  justify-content: flex-start;
}

.wrapper .name,
.wrapper .message {
  margin: 0;
  padding: 0;
  font-size: 14px;
}

.wrapper .name {
  font-size: 12px;
}

.wrapper .message {
  background: #fbf3d4;
  border: 1px solid rgba(0, 0, 0, 0.1);
  border-radius: 3px;
  padding: 3px;
}

.incoming .message {
  background: #ec1982;
  color: white;
}
Step 4: Write JavaScript for WebSocket Interaction
Now, create the script.js to handle WebSocket communication and message sending/receiving:
var socket = new WebSocket("ws://localhost:8080/chat");
let userName = null;
let socketIsOn = false;
const userInput = document.querySelector("#user-input");
const chatBox = document.querySelector("#chat-box");
socket.onopen = function () {
socketIsOn = true;
};
(function () {
const name = localStorage.getItem("name");
if (name) {
userName = name;
return;
}
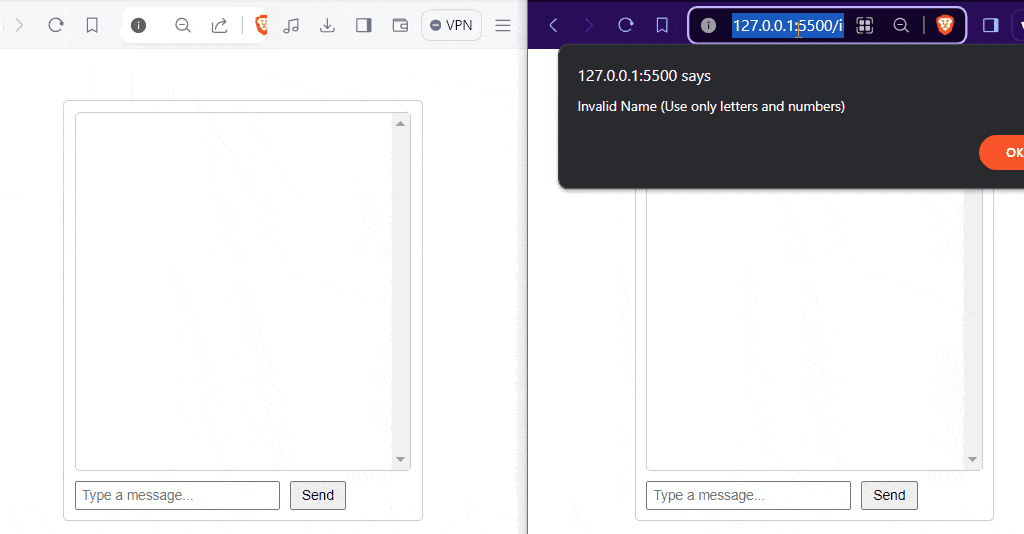
let person = prompt("Please enter your name:");
if (person && /^[A-Za-z0-9 ]+$/.test(person)) {
localStorage.setItem("name", person);
userName = person;
} else {
alert("Invalid Name. Use only letters and numbers.");
handleUserName();
}
})();
function createEl(type, attr = {}) {
const el = document.createElement(type);
for (let i in attr) {
el.setAttribute(i, attr[i]);
}
return el;
}
function generateMessage(userName, msg) {
const wrapper = createEl("div", { class: "wrapper" });
const name = createEl("span", { class: "name" });
name.innerText = userName;
const message = createEl("p", { class: "message" });
message.innerText = msg;
wrapper.appendChild(name);
wrapper.appendChild(message);
return wrapper;
}
function sendMessage() {
const message = userInput.value.trim();
if (userName && socketIsOn && message) {
const msg = generateMessage(userName, message);
const outgoingMsg = createEl("div", { class: "outgoing" });
outgoingMsg.appendChild(msg);
chatBox.appendChild(outgoingMsg);
socket.send(JSON.stringify({ name: userName, message }));
userInput.value = "";
}
}
socket.onmessage = function ({ data }) {
const { name, message } = JSON.parse(data);
const msg = generateMessage(name, message);
const incomingMsg = createEl("div", { class: "incoming" });
incomingMsg.appendChild(msg);
chatBox.appendChild(incomingMsg);
};
function submitOnEnter(ele) {
if (event.key === "Enter") {
sendMessage();
}
}Step 5: Test the Application
To test the application:
-
Start the WebSocket server:
php socket.php -
Open
index.htmlin two different browser windows (use incognito mode for separate sessions). -
You should now be able to send and receive messages in real time between the two browser windows.
Conclusion
Congratulations! You’ve built a simple real-time chat application using PHP and WebSockets. You can further enhance this app by adding features like user authentication, message persistence, and multimedia support.
Happy coding!